|
Gear panel  |
Center pedestal 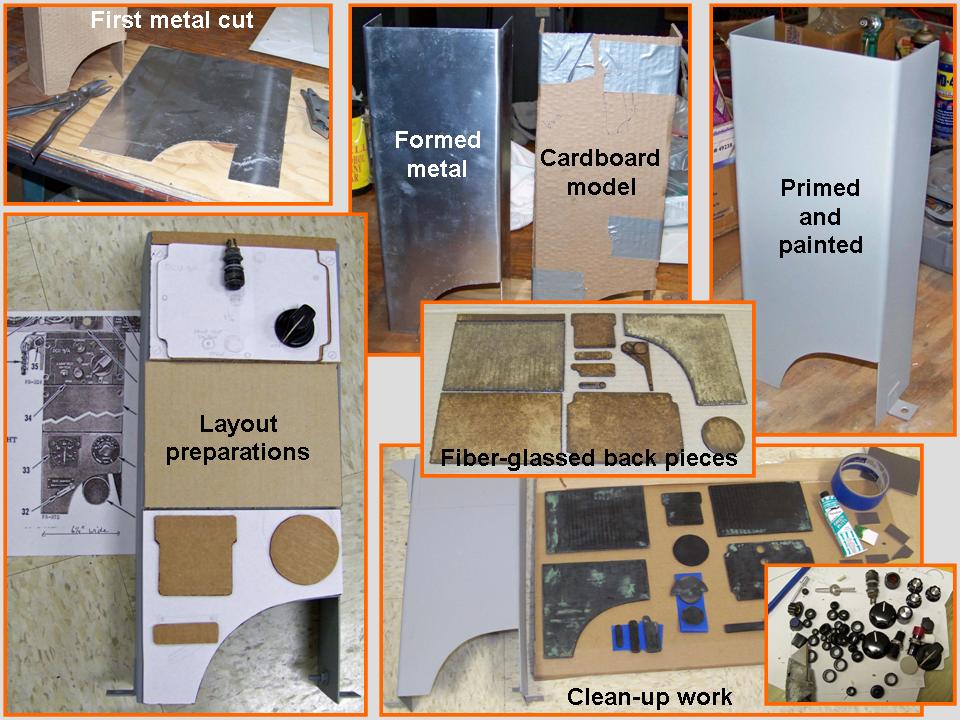 |
In progress ...  |
Multi-tasking is the name of the game when you're working on a project that is as extensive as this one is. After the work you saw documented in Cockpit, Part 2, had been completed, I installed the gear panel you see in Figure 1, cell 01. [Incidentally, by the time I installed the gear panel, the fuselage had already been painted and moved to my F-100 "museum." You can check out the completed fuselage work via the Fuselage (Part 11) and Fuselage (Part 12) options on the Restoration Menu.]
Figure 1, cell 02, shows the process that yielded the partially-completed center pedestal. Note that the "production" procedures used the now-perfected sequence ... from paper tracings to cardboard templates to metal. Instrument back plates were made from cardboard covered with fiberglass resin that was painted black after extensive sanding. You can make a good switch from a long-shanked rivet and various electronics shops are great sources for knobs and buttons. (If a specific shape was needed, I cobbled various components together -- cardboard cut-outs, small washers, wood carvings, and so on. The tops of small clear-plastic round containers became instrument faces and the "instruments" were printed from Powerpoint drawings. The tops of Dremel tool accessory boxes became "push to test" buttons, and so on. (A little imagination goes a long way!)
In the meantime, work progressed on the center (pedestal) panel ... it's amazing what can be done with fiberglass resin. For example, to make selector knobs, I cut slices off a dowel stick, then wrapped the resulting "puck" with tape, leaving 1/4" of the tape above the top of the puck. If you leave space between the tape and the puck to allow for the "pointy end(s)" of the selector knob and then pour the fiberglass resin to the top of the tape, you get a good blank to work on. (Placing the contraption on a piece of tape to seal the bottom edges will stop the fiberglass resin from leaking out.) A bit of work with a Dremel tool and some paint and you wind up with a really clean selector knob. This technique ensures that there are few limits on shapes, textures, or sizes. One more problem solved ... Figure 1, Cell 03, documents the work that led to the completed center pedestal.
Note: You can enlarge the pictures by clicking on them. Many of the pictures can be enlarged some more by placing the cursor on them and clicking again. Then maximize the window to get an even closer look.
|
Gear panel |
Center pedestal |
In progress ... |
When the center pedestal has been completed and installed, you will see it in Figure 2, cell 01. Cells 02 and 03 will show the instrument panels I'm currently working on. Those panels contain a lot of lettering, so Jack and Beth Harrell are coming to the rescue to produce a flawless set of dials and labels.
As this major "modeling" project moves forward, I will post pictures of the progress we're making. I may not be able to have a real F-100 ... but a properly contructed full-scale model will not be distinguishable from the real thing. Stay tuned.
While the rebuilding and restoring efforts are important, please remember that the main focus of the F-100 project is its database. If you can supply stories and pictures that reflect your experience with the Hun, please do so. (You can click on the Contact me link to send me an email.) The objective is to develop a very comprehensive personal history of the Hun and of the people who flew and maintained her. You and the Hun deserve to be remembered in your own words.
If you want to return to the home page, you can either click on the
Home link shown here or by clicking on the Home link shown on left side of your screen. (You can also use any of the navigation bar links shown on the bottom of the screen to move around this website.)